Gantt Chart
Developed by Katrine Boesgaard

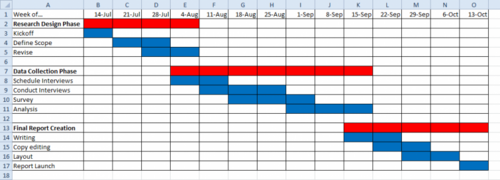
A Gantt chart is a commonly used tool within project management, which, briefly, shows the progress of an on-going project. It is usually made as a bar chart and it relies upon Work Breakdown Structure (WBS), which is a method within project management as well. An example of a simple Gantt chart is shown in Figure 1 to the right. In this case only the duration of the different phases of a project is shown, and then the start and end time of the tasks which needs to be performed during each of the phases. The history of the Gantt chart goes all the way back to the 1890s where the first version of it was invented by a polish engineer called Karol Adamiecki. The purpose of it was to be a methodology for work harmonization, which was based on graphical analysis. His contribution to the project management tools is known by the name harmonygraph. [1] Around 15 years after the American engineer and management consultant, Henry Gantt, developed a new and improved version of it, which is the one that today is known as the Gantt chart. [2] [3]
Contents |
How the Gantt chart is used
The chart shows the tasks that need to be done in a project, when each task needs to be performed, and how long time they are going to take according to the plan. So basically it is a timeline for the project, which manageable illustrates the start and end dates for tasks and events, and how they relate to each other. It is up to the project manager to decide how detailed the chart should be – For instance it could also contain information about who is doing which task etc.
A Gantt chart is based on a grid with horizontal and vertical lines, which goes a across the chart. They divide the chart in equally sized boxes, each representing a single unit time in an optional unit (weeks, days etc.). Along the vertical line is each task written, so each row in the chart represents its own task. As mentioned before it consists of horizontal bars – Each of them represents a task, when it begins and when it is supposed to be finished. [4]
Dependencies
It is also possible to plot dependencies into the Gantt chart. It is arrows indicating which tasks are depended on which, and how they are depended. There are three different types of dependencies; ‘Finish to start’, ‘finish to finish’ and ‘start to start’.
- ‘Finish to start’ indicates that one task needs to be completed before the other one can get started.
- ‘Finish to finish’ indicates that two tasks needs to be finished in the same time, but they can start at different times.
- ‘Start to start’ shows that two tasks have to be started in the same time, but they don’t necessarily have to be finished in the same time.
However, there exist two more types of dependencies, which often are used in Gantt charts ass well.[5]
Lag dependencies This type of dependency indicates the amount of time between one task is finished and the next one can begin. An example on this could be when the foundation has been casted, but it has to dry completely before the next team of workers can begin on a new task on the site. The lag dependency would in this case be the time that it took for the foundation to dry.
Partial dependencies In this case the dependency describe the time there has to pass between the start of one task to the beginning of another task.
All three types of dependencies are indicated as a horizontally going arrow in a Gantt chart. [6]

Critical path
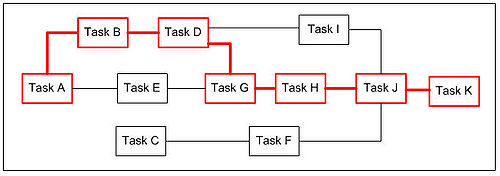
When creating a Gantt chart, there is also made use of the method of critical path. The definition of the critical path is a series of tasks that needs to be done ‘in a specific order’ and have to start and end within time in order to finish the entire project on schedule. For instance: A project is scheduled to finish in week 10 and it consists of 11 different tasks, named A to K. The last task that needs to be executed is task K, and task K is depended on the finish time of task J, which is depended on the finish time of task H, which is dependent on task G, dependent on task D, dependent on task B and then in the end task A . Then if task A gets delayed it will affect the finish time of all of the task in the rest of the chain, and thereby will the project not be finished on schedule. [7]. An example can be seen in figure 2 to the right.
Float
For the tasks not on the critical path, the difference between the time available for each task and the time required for each task also needs to be considered and evaluated. This amount of time is attached to each task and is called ‘float’. If using the latter mentioned project example as starting point, and assuming that task 5 was planned to finish in week 5, and that task 3 couldn’t be executed before task 5 was finished. Then the time between the scheduled finish time of task 5 and the start time for task 3 would be the float for task 5. [8]
Risk mitigation
At last ‘risk mitigation’ also needs to be considered by the project manager. This has to be done in order to prevent the time schedule from failing, and is done by ‘adding’ time to the project. It can be done in two different ways, which is ‘float’ (as explained before) and ‘contingency’. The difference between these two methods is that ‘float’ only is the available time for things being delayed. ‘Contingency’ is time planned where things can be delayed in. It is planned on a task-to-task basis, meaning that there will be planned extra time in the schedule for each task. The amount of extra time varies from task to task and is decided by evaluating how high or low risk the task is evaluated to be. This means that a high-risk task would get more extra time than a low-risk task.
Many project managers also uses the Gantt chart to indicate how much of the project and tasks is finished. This can be done in several ways. First, a bar can be placed in the bottom of the chart, which percentage is showing the progress of the entire project. Another way is to indicate how far in the progress every task is by adding such a bar to each task. When doing this, the information needs to be up to date the entire time though, in order to gain anything from it. In this way the project manager easily can keep track on the progress with the project, and quickly be aware of any delays. [9]
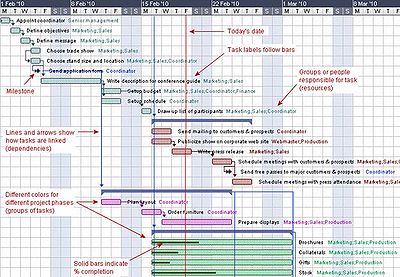
In Figure 3 a larger and more advanced Gantt chart is shown, since it contains a lot more information than the chart in Figure 1. For instance is it added who is responsible for which task, which tasks is connected with other tasks and the milestones for the project.[10]
How to apply the Gantt chart
A Gantt charts is applicable in practically every kind of event or project, where tasks need to be planned and organized relatively to each other. An example where it is used can for instance be in the planning of a building process. In such a process a lot of things like ordering materials, hiring workers and planning when and in which order every thing needs to happen, a Gantt chart is a very useful tool because it gives a good and manageable overview of the progress.
When the Gantt chart was first developed and many years after, the construction of it took a lot of time, since the only way of doing it was by hand. That meant that every time a mistake was made, or if the time plan suddenly changed due to sudden changes or obstacles, the entire chart had to be redrawn from the very beginning. Today this problem isn’t such a big a deal as it was at that time, due to our computers and different programs made only to create Gantt charts. It still takes time to redo the chart when changes occur, but not nearly as much. There exist lots of different programs to use when creating a Gantt chart, below some of them is mentioned and briefly explained.
- Microsoft project
This program is only for windows users, and is one of the most adopted software’s within project management. It really goes in depth with the tool, which is why it can take some time to fully learn. However, it also contains templates to use instead of creating the chart by your self from the bottom, which can make the use of the program a bit easier. [11]
- TeamGantt
TeamGantt is an online program, which is designed to create and share Gantt charts. It is a simple program that is easy to use due to its drag and drop functions, and then it is easy to share with co-workers, clients, stakeholders etc., since it is web-based. Another useful feature about the program, is that it is possible to make comments to each ‘block’ in the chart, as well as files can be uploaded and connected to a block.[12]

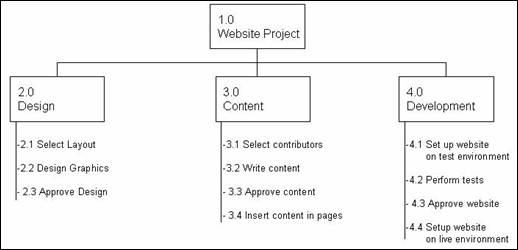
However, before the programs can be used, the work breakdown structure has to be created. Here each of the tasks and subtasks are defined in order to obtain knowledge about the total amount of work needed for the specific project. In figure 4 an example of a work breakdown structure is shown, in this case for creating a webpage. In the top of it we have level 1 of the project, which is the name of the project; Webside project. Then in level 2 the overall tasks are defined, which is Design, Content and Development. However, these tasks doesn't contain enough information about the amount of work there will be required for each task. Therefore a level 3 is created for each task, describing the subtasks that belong to each task. For instance the layout needs to be chosen, the graphics needs to be designed and the design has to be approved before the task Design is completed. Therefore a Gantt chart consists of all the subtasks in a project, and that is why the work breakdown structure has to be completed before the chart can be started.
Example of managing a project with Gantt charts
This is an example made to show how to use and apply the Gantt chart to a project. It is assumed that a building project needs to be planned, and a chart is required, which contains information about when each task can begin, which and how many workers are required for the tasks, the duration of the project, and where the dependencies and the critical path is.
The first step is to create a work breakdown structure, which means breaking the project up in smaller parts that is goals, milestones and tasks - Just like explained above. This is done in order to simplify the project and make it easier to make a time schedule. In the work breakdown structure is each task, their task dependencies plus the duration of each task defined.
When this is done a table can be set up with all the collected information. A simplified example of such a table is shown in Table 1.
| Task | Start | Duration | Dependencies |
|---|---|---|---|
| A | Week 1 | 3 week | |
| B | Week 4 | 3 week | A, D |
| C | Week 7 | 3 week | B, E, F |
| D | Week 1 | 2 week | |
| E | Week 4 | 1 week | |
| F | Week 4 | 2 weeks | |
| G | Week 6 | 2 weeks |
When this is done, the Gantt chart can be created in for instance excel (Or another program). The example created for this example is shown in figure 5. The critical path tasks are the red blocks and the other tasks are the green boxes. The blue boxes are indicating the float of the green tasks, and the arrows indicate the dependencies of the tasks in relation to each other. This can as mentioned be done in a more advanced way, and contain more information than this particular chart. But as mentioned, this is only a simplified example that was made in order to give an understanding of creating Gantt charts.
Limitations
However, the Gantt chart does also have its limitations, and will in some cases not be the most optimal tool. In the section some of its disadvantages will be evaluated and listed.
- The Gantt chart is based on the work breakdown structure. This means that if the work breakdown structure isn’t constructed, the Gantt chart cannot be made.
- If it is applied to a very complex project, the chart will be very large and can be confusing to read. In these cases companies often need to hire specific managers to control the chart. For smaller companies this can be rather expensive.
- During all projects it will be necessary to update the chart many times due to changes. And if this isn't done, the project can end in a catastrophe if the project manager doesn't keep track of the schedule otherwise. But updating the chart can be highly time-consuming if you don’t have the ability to change the chart frequently and easily.[13]
- A last limitation about using Gantt chart is that they don’t show how much work actually is needed for each assignment. They only show the length of it. For instance a shorter bar could require 20 times more workers than a longer bar, but it won’t be visible in a Gantt chart. So the tool doesn’t entirely reflect the entire picture of a project.
Even though the above listed disadvantages, the Gantt chart still is a very useful tool within project management. Especially if you aren’t that familiar with project management, it is a good starting tool since it is easy to understand and create. If a larger project needs to be planned, Gantt charts might not be the best tool to use due to the above limitations. But for smaller projects and events, or if the project manager is very experienced the Gantt chart definitely is a good way to organize and manage projects.
References
- ↑ [http://www.mosaicprojects.com.au/PDF_Papers/P042_History%20of%20Scheduing.pdf ] A brief history of scheduling
- ↑ [http://www.idealware.org/blog/tools-gantt-charts]Tools for Gantt Charts
- ↑ [https://www.mindtools.com/pages/article/newPPM_03.htm]Mindtools.com
- ↑ [Orr, Alan (2003) Uncharted territory]
- ↑ [https://www.mindtools.com/pages/article/newPPM_03.htm]Mindtools.com
- ↑ [Orr, Alan (2003) Uncharted territory]
- ↑ [Orr, Alan (2003) Uncharted territory]
- ↑ [Orr, Alan (2003) Uncharted territory]
- ↑ [Orr, Alan (2003) Uncharted territory]
- ↑ [www.gantt.com]What is a Gantt Chart?
- ↑ [https://products.office.com/en-us/project/project-and-portfolio-management-software]Project management software
- ↑ [https://teamgantt.com/gantt-chart-software/]Features - TeamGantt
- ↑ [https://www.projectsmart.co.uk/gantt-charts-pert-charts-what-use-are-they.php]Gantt charts, PERT charts: What use are they?
Bibliography
- Orr, Alan (2003): 'Uncharted Territory?': This is an article written by Alan Oro, and is written for a journal called Engineering Management Journal. It provides really good information about the basic of a Gantt chart, like how is it made, which features does it have, and how to use it.
- www.gantt.com: This is a web-page completely devoted to Gantt charts. It provides great information about the use of it, how it is created, which softwares is available on the marked for creating Gantt charts, and to links and articles about related management methods.
- https://www.mindtools.com/pages/article/newPPM_03.htm: This is a page about planning and scheduling team projects, with the Gantt chart as the main focus. It provides a lot of information about the origins of the tool, why it is good to use in project management, how you create a Gantt chart and a few good examples.
- http://www.wikihow.com/Create-a-Gantt-Chart: This internet page provides information and a guide of how to create a Gantt chart if using an excel sheet. It is explained step by step, and is very easy to follow.

